Scheduler - Basic Automation
Note - This feature has been replaced by the Software Integration Kit and is no longer supported in versions 2013 and on.
This documentation is included for our existing legacy clients, and the inclusion of this feature in future versions of software cannot be guaranteed.
Overview
The Scheduler is used to schedule single file imports and file transmission. If you need to schedule multiple files during the same
routine, see Custom Import Menus.
Process
There are two steps to scheduling an automated file import and transmission (from now on called a job).
1. Create the job. This would be the account to be used and the file to be imported.
2. Running the job. This instructs ACH Universal on time and frequency the job should be run.
Create the job
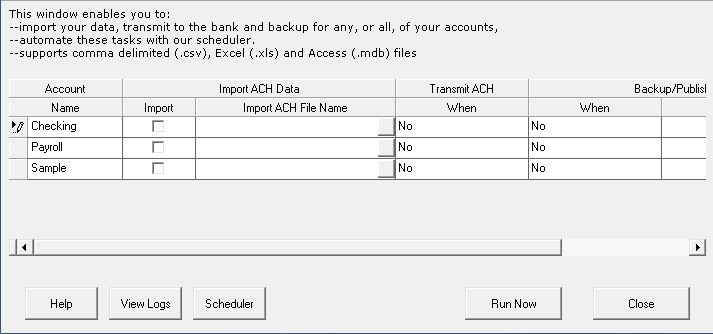
Select the Automation tab > Basic and you will see a form similar to the one below.
Note: If you are using a version prior to 2013, select Control Panel from the main menu. The Control Panel (below) will be displayed.

Figure 1 - Control Panel
All the accounts are shown in the grid. In this case, Checking and Payroll have been created for live data. (Remember: Never use the Sample account for live data). They both can be scheduled to run at the same time, or you can choose to schedule just one account. Note: It is not possible to schedule them at different times and days using the Scheduler. See Custom Import Menus if you need this type of setup.
To create a job:
Enable the checkbox in the Import column of the account you wish to use.
Click the gray box under the Import ACH File Name to browse for the source file to be imported.
Select how you wish the system to handle transmission of the ACH file. Your choices are:
•No (ACH file is created, but not transmitted. You must transmit manually).
•Only when new records imported
•Yes, always (On every job, the file is transmitted using the method you set)
Schedule the job:
Click the Scheduler button.
A screen will pop up requiring a Windows user name and password. The Scheduler will use this user name and password to schedule the job. You may leave the password blank, but the job may not run due to lack of authorization as required by Windows.
After entering user name and password, click Next.
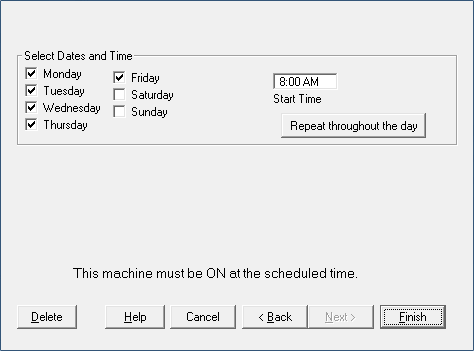
The Scheduler will now be displayed (below).

Figure 1 - Scheduler
To schedule a job to run once a day on certain days and at certain times, select the checkboxes for each day and then enter the time in Start Time textbox.
If you need to schedule a job to run multiple times per day, click the "Repeat throughout the day" button.
Information shown in Figure 2 (below) will be displayed in the Scheduler window.

Figure 2 - Repeat throughout day
Click the checkbox.
The job can be scheduled to run in increments of hours or minutes. Enter the length of time between job runs and then select hours or minutes from the drop-down box.
In the textbox on the right side, you can specify the end time for the schedule.
For example, ABC Company wants to run their job every 30 minutes, but only between 11 AM and 3PM.
In Figure 1, ABC would set the start time to 11:00 AM and choose the appropriate days. In Figure 2, ABC would enable the checkbox, then enter 30 into the first textbox, change the dropdown to minutes, and put 3:00 PM in the remaining textbox.
When completed, click Finish.
