|
|

Account Creation |

|

|

|
|
Account Creation |
|
|

|
|
|
Account Creation |
|
|
|
|
Account Creation |
|
|
|
|
|
||
The first step in using ACH Universal is to create an account to hold your imported data. This applies to both CTX and non-CTX codes. If you will be creating CTX as well as non-CTX files, it is recommended you use one account for CTX-only transactions and one account for all other transactions.
Creating an Account
Follow the steps in Account Creation to create the account. There are no differences between CTX and non-CTX transactions.
Follow the steps in Account Setup to set up the originating account. There are a handful of differences detailed below.
Format Selection
On Screen 4 of 6, you will see Figure 1 (below). Select the radio button for CTX-EDI Subsets. In almost every situation you will use EPN STP 820. Make sure it is visible in the dropdown box.

Figure 1 - Account Setup
Profile Selection
On the next screen (Screen 5 of 6), you will see Figure 2 below. CTX will always use profiles and the lookup must be by name. Ensure the Name radio button is selected.

Figure 2 - Account Setup
CTX Tab
On the final screen (Screen 6 of 6), select the CTX tab. You will see Figure 3 (below).
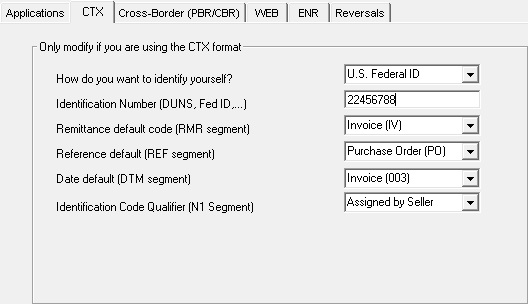
Figure 3 - Account Setup
In the first dropdown box, select the method your organization is using to identify yourself at the transaction level. This is decided by your bank. Your choices are:
U.S. Federal ID |
Federal ID number |
DUNS |
Dun and Bradstreet number |
DUNS plus suffix |
Dun and Bradstreet number with a mutually-agreed upon suffix string |
Enter the ID number of the type selected into the textbox.
Leave the defaults for all other fields unless instructed differently by your bank.