Add a workstation to an existing SQL Server
environment
"Excellent service. Your customer service representative helped us from setup to transmission. He followed up to make sure everything was working as expected."- FrameCon
Overview
Install Treasury Software (client) on the workstation
Configure
We recommend printing these instructions.
Install Treasury Software (client) on the workstation.
1. Obtain the same version of software from your administrator that
you are using on the other workstations.
The version number can be found by starting another workstation's
copy of Treasury Software and entering into an account. Then from
the main menu select 'Help', 'About'.
2. Install the software on a workstation (make sure that you have
administrator rights to the computer).
3. Start the software. From the 'Welcome New User' screen, select
the application you are using (ACH, Bank Reconciliation or Positive
Pay).
Confirm that you are on the same version of software as the other
workstations - from the main menu select 'Help', 'About'. If you
are on a newer version - you need to uninstall and obtain another
copy.
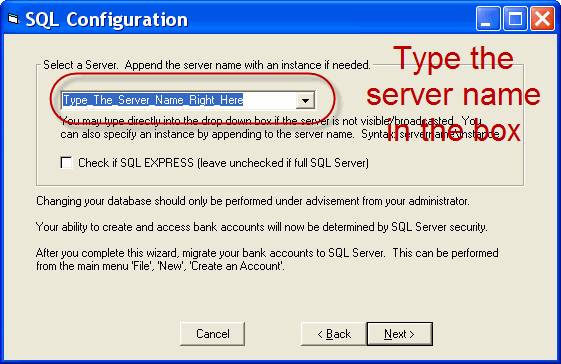
4. From the main menu select 'File', 'Migrate to SQL'. Point to
the server and complete the wizard. Exit the software.
5. If this is a new user - confirm their security permissions on
the SQL server with your database administrator (as below):
Enter into SQL Server Management Studio.
Each database will have a role/group called 'BankRecPosPayUsers'.
Select Security (at the server level, not below a database). Select
'Login'. Confirm the existence or create new Login ID's for the
user. To add a login, right click on 'Login' and select 'New Login'.
Once you have created a login, you need to associate the login with
the role 'BankRecPosPayUsers' for each database. Don't forget to
grant access to the 'Sample' database. There are two approaches
to this:
--Individual
Enter into each database and drill down to Security. Select 'User'
and then add the role to the user's permissions, or select the role
and add this user as a member to the role.
or
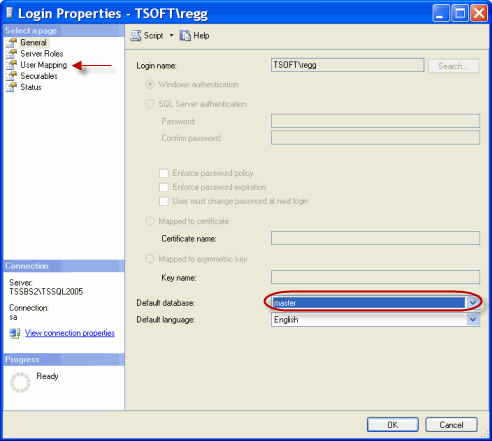
--Global (SQL 2005 and above) - Click on Security at the Server
level (not within an individual database), then 'Logins'. Select
and right click a login to edit it's properties. Select 'User Mapping'
from the far left of the Login Properties window. Here you can add
the user to the role for multiple databases with a simple checkbox.
6. Add the accounts as appropriate.
From the main menu select 'File', 'New Account', 'Add an Existing
Account'. Select the accounts that the user should be able to see
on their list of accounts.
7. Enter license and custom codes.
License - From the main menu select 'File', 'Enter License Codes'.
Enter the codes and click 'Register'.
Custom codes (if applicable) - From the main menu select 'File',
'Options', 'General', 'Custom' tab.
Tips:
The #1 issue in any installation is security.
--Make sure that you have a system administrator login ID before
starting
--Create/arrange for a login for the user (if new)
Congratulations!
Can't find your server listed when migrating?
Doesn't mean you can't connect. Type the server name in, such as
MainSQL
If there's a named instance (Accounting) , don't forget that:
MainSQL\Accounting
I found the server, but I can't connect.
If using Windows Authentication, make sure that there is a login
ID for the user.
If using SQL Server security, confirm your ID and password.
Also make sure that the login ID has the default database set to
'Master'. Note: If 'Master' is not listed in the drop down box -
click on User Mappings and grant permission to the user for 'Master'.
Any questions? Please call 866 226-5732.
|