|
Reinstalling a workstation (SQL Server)
We recommend printing these instructions.
The key to any successful installation, is security.
Prior to installing any software, confirm that the user has sufficient rights on the SQL Server.
If this is a new user to Treasury Software - confirm their security permissions on the SQL server with your database administrator (as below):
Enter into SQL Server Management Studio.
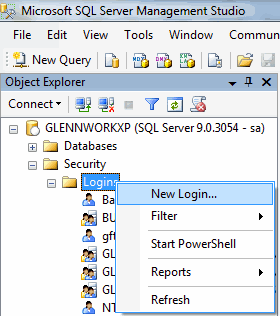
Select Security (at the server level). Select 'Login'. Confirm the existence of the user's ID.
If there is no login, please create one now.
To add a login, right click on 'Login' and select 'New Login'.

Enter the user's login name and complete the security options per your corporate environment.
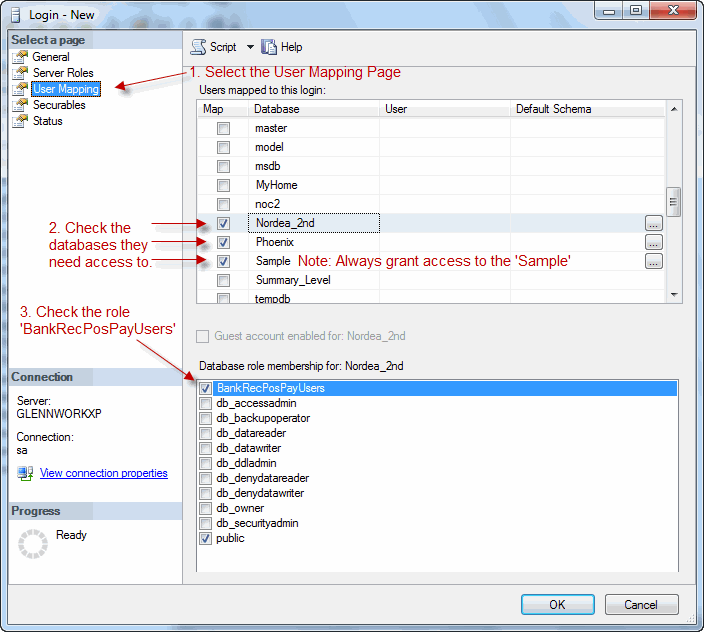
1. Select the User Mapping's page
2. Check the databases they need access to. Note: Always grant access to the 'Sample' database.
3. Make sure that the role 'BankRecPosPayUsers' is checked

Click OK when finished.
1. Obtain the same version of software from your administrator that you are using on the other workstations.
The version number can be found by starting another workstation's copy of Treasury Software and entering into an account. Then from the main menu select 'Help' > 'About'.
Don't have the installation file for the same version?
Stop here and follow the instructions for upgrading SQL Server.
2. Install the software on the new workstation (make sure that you have administrator rights to the computer).
3. Start the software. From the 'Welcome New User' screen, select the application you are using (ACH, Bank Reconciliation or Positive Pay).
4. From the top menu select the 'Settings' tab > 'Migrate to SQL Express, SQL Server'.
Note: If you are using a version prior to 2013.
From the main menu select 'File' > 'Migrate to SQL'.
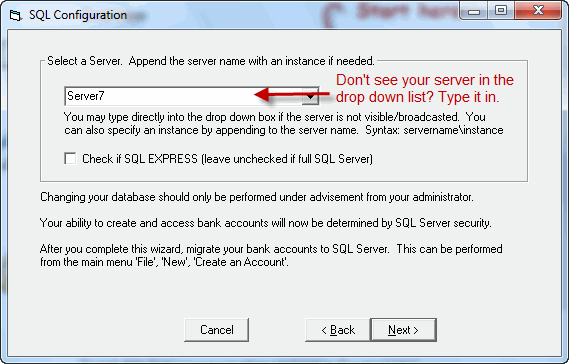
Point to the SQL Server in the drop down list.
If you don't see your server listed, you can type it directly into the box.
Tip - If there is an instance of SQL Server - don't forget it.
If the instance was Accounting on Server7, it would be displayed as Server7\Accounting

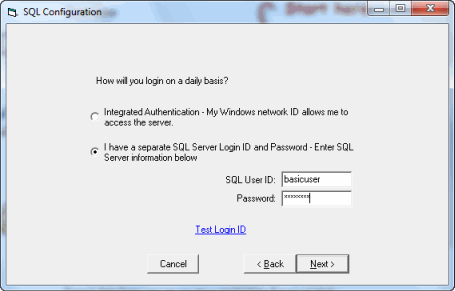
5. Enter in the USER's credentials, as you have them on your SQL Server.
Click either 'Test Login ID' or 'Next'. Complete the Wizard.

Complete the wizard. The system will prompt you to exit and re-enter.
From the 'Welcome New User' screen, select the application you are using (ACH, Bank Reconciliation or Positive Pay).
6. Add the accounts as appropriate.
From the main menu select 'File' > 'New Account' > 'Add an Existing Account'. Select the accounts that the user should be able to see on their list of accounts.
7. Enter license and custom codes.
License - From the main menu select 'File' > 'Enter License Codes'. Enter the codes and click 'Register'.
Custom codes (if applicable) - Select the 'Settings' tab > 'Import, System' tab > 'Custom' tab.
Note: If you are using a version prior to 2013. Custom codes (if applicable) - From the main menu select 'File' > 'Options' > 'General' > 'Custom' tab.
Congratulations!
Tips:
The #1 issue in any installation is security.
--Make sure that you have a system administrator login ID before starting
--Create/arrange for a login for the user (if new)
| 


